I'm sad to tell you that this will be my last post. I have really enjoyed making this blog and learning about picture editing and how to properly use a camera. I didn't know that it was possible to make a photo look so good without being a professional. I have never owned a good camera, but I seriously doubt that most people with one know how to use it because I have never seen anyone playing around with one like we have done during these past weeks.
Thank you for following me on the journey to become a better photographer and photo editer! :)
torsdag 8. januar 2015
torsdag 18. desember 2014
The last assignment
For our last assignment we are going to put up our best photos, these are going to be the ones that decide what grade we get, allthough the entire blog also something that will be evaluated. We get to choose at least 3 topics we want to upload photos of, in all 8 photos, and then explain what settings I've used and editing and so on.
I have chosen to upload 2 photos each of these topics:
1. Water
2. Architecture
3. Light
4. Optional
All of the photos have been taken using Canon EOS 1100D & Canon EOS 450D
WATER
I have chosen to upload 2 photos each of these topics:
1. Water
2. Architecture
3. Light
4. Optional
All of the photos have been taken using Canon EOS 1100D & Canon EOS 450D
WATER
 |
| The idea of both of these photos is to show how the swans feathers interacts with water. The main object is here placed in the middle of the photo and lights up while the rest is darkened, so its definately the focus in the photo. To get all the movements without blurring it out I have used short shutterspeed. I have also edited this photo quite a bit, changing the lighting and putting on a filter called Cinemascope, as you can see. But only to enhance the waves of the water. |
 |
| This photo has also been edited, just not as much. The lighing has been altered a bit but I was actually quite lucky with the lighting here. Again with the focus in the middle of the photo and taken using short shutterspeed. This is my favourite. ISO set to auto in both pictures. |
ARCHITECTURE
 |
| I think this one is my favourite of the architecture pictures. I like how its so clean, abstract, the balance and the lighting is perfect. This is actually a lamp, but I turned the camera to a dark setting to make sure the picture didn't turn out as bright as it would otherwise. Believe it or not - this picture is not edited! This experience really taught me the meaning of the brightness and darkness setting. |
 |
| I really like this idea of the stickfigures in one building walking on top of another. It looks like it has some kind of deeper meaning but really it was just a lucky shot, I think. The meaning came afterwards while watching all the photos I had taken that day. If i had to name this photo I would name it something like ''Ignorance'' or something like that because the stickfigures symbolize the black and white bubble we live in while everything is going on around us. I have learned that a simple idea can become something greater. |
LIGHTING
 |
| As I've written in earlier posts, this is my favourite light photo. It's so balanced and sterile. The original idea was just to get a longer photo because I have seen how many people have long photos after each other to complete a full photograph. This is only one photo, but again with the simple idea becoming something unexpectedly good. I have edited this slightly to make the light lighter and the dark darker. ISO is set up quite high so that it wouldn't get blurry while holding the camera. |
 |
| This one is very interesting. The idea behind this picture was to drastically see the difference of light and darkness. The lighting has been edited and I had to cut out some of the upper right corner and replace is with black to make it completely dark. The photo is equally dark as it is white because of the ''thickness'' of the paper, i think, allthough it may look like its more black. ISO on 1000. |
OPTIONAL TOPIC
For the optional topic I have chosen swans because I loved taking pictures of them.
 |
| Portrait of a majestic swan. The white feathers and the beak is in focus. This picture has not been edited, I was lucky with the sun making a warmer appearance. I have my camera set on short shutterspeed to capture the swan in the right moment. In the picture the swan looks calm and mysterious, when in reality it tried to bite me. |
 |
| The balance is nice in this photo, the shimmering water on the right and the white coat of fur makes up for the dark colours on the water to the left and the stone wall. The swan is in its typical posture with the neck bent and forming a circular hole for the light to shite through. Again with the short shutterspeed, and no editing on this one either. |
 |
| I couldn't decide between the 3 photos, so I threw this in too. Light and darkness has been edited to bring out the feathers more. I do wish I caught the whole reflection of the swan in the water, and that the picture was a bit longer on the top, but again - Lucky shot. Shutterspeed set to short. |
mandag 15. desember 2014
Miniature people
We used photoshop again today, and todays topic was miniature people which means we took photos of each other and a ''background'' and eventually scaled down the pictures of us to become tiny people.

To get the first photo out of its
background we use a tool called Quick Selection Tool. This will go after the
colours and help you to separate the front from the back. If the tool makes any
mistakes you can just press ALT and it will move the dotted line thats around
your object to the place you want it to be.
To remove your current background just copy
your layer and paste it to make two layers. Now you should see a small picture
to show what you have left. If you only got a copy of the background you don’t
want, you just go back and press Select à
Inverse.
Now that you have your main object cut out
you can create another layer and place a new background photo in it.
Remember to put the layer you cut out on
the top and the background you want underneath it. If the main objects isn’t
the size you want it to be you go to Edit à
Transform à Scale
Anything missing? Maybe the hair of a
person has become partly lost during the job? Go to Select à Refine Edge. Here you can feather out any harsh edges and bring back lost details.
Here is my result!
fredag 28. november 2014
Liquify
Liquify is a tool you use to make something bigger or smaller. To get to liquify in photoshop you go to Filter --> Liquify. Or if you are on PC just press Shift + Ctrl + X.
A new window will open and these settings will appear on the right side of the screen

The most important tools you want to remember is the one that is marked blue and the one above. The blue one enlarges what you press while the other one does the opposite.

A new window will open and these settings will appear on the right side of the screen
The most important tools you want to remember is the one that is marked blue and the one above. The blue one enlarges what you press while the other one does the opposite.
To your right you can see this box where you can choose the size of the brush you want to use and how much pressure you want to add to it.
torsdag 27. november 2014
Reflector
Today we got to use reflectors to see how the lighting from it works on the object we are taking pictures of.


The barely seethrough side is used to make the light softer insted of as harsh at it turned out using the plain white reflector. The changes wasnt that big so we didn't use it too much as we wanted to see drastic changes in the lighting in our photos.
One can also find black reflectors and silver ones, but we didn't get to use them today. The black one will steal away som of the light and make it even darker where it is used. The silver one reflects more light than a white reflector. It also makes the light a lot brighter.
This is the type of reflector we used. The outside was a removable sheet of goulden, shimmery fabric. The inside was a barely seethrough, white sheet. If we had the goulden sheet on one side the other side became a bright white that we again could use as a reflector.
The goulden sheet made the photo a lot more warm and cozy. It made the pictures turn out a bit orange but I think it looks a lot better than when we used the others.
The white side is good if there isnt a lot light to work with from the beginning. When we tried to use it outside we found out that it looked a bit harsh so we didn't use this very much.
The barely seethrough side is used to make the light softer insted of as harsh at it turned out using the plain white reflector. The changes wasnt that big so we didn't use it too much as we wanted to see drastic changes in the lighting in our photos.
One can also find black reflectors and silver ones, but we didn't get to use them today. The black one will steal away som of the light and make it even darker where it is used. The silver one reflects more light than a white reflector. It also makes the light a lot brighter.
Documentation, Report and Art
A photograph is being used in many different ways but the following are the main categories.

.JPG)

Art
An artistic photo is used to convey a story and tell something more than just a print. Here is an example:
Documentation
It means to document an event or happening, a place and so on.
Report
One might think that this is the same as dokumentation, but its not. It is similar but not the same. A report is used to tell a story, and in photography the photo has more meaning than just being a pretty picture.
Sources:
http://madworldnews.com/video-see-happens-homeless-man-goes-undercover-cash/
http://commons.wikimedia.org/wiki/File:N24-Reporter_mit_Kameramann_-_K%C3%B6ln_(7344).JPG
http://commons.wikimedia.org/wiki/File:N24-Reporter_mit_Kameramann_-_K%C3%B6ln_(7344).JPG
.JPG)
mandag 17. november 2014
Photostudio
Today we got to use the photostudio! It was a quite small room with a completely white corner. We were not allowed to use shoes in this corner in case we had dirty shoes.
 |
| Proof that I was actually in there. |
 |
| The floor wasn't cornered but bent to create the illusion of not having any sharp edges interfering with the main object. |
 |
| Of course we had to take mid air photos! |
lørdag 15. november 2014
Photoshop
We have started using Photoshop learning the basic skills. Today we talked about layers and how to alter the colours and make a photo black and white.

 When you have done that you can see in the box to the left there is a small photo of your picture and this is your first layer. We use layers to separate our workprojects from each other so that its possible to remove or add an edit without interfering with another. To make a second layer you press the first layer and drag it down to the ''Create a new layer'' that has a picture of a sheet of paper under the layers.You now have two layers! This is what the ''new layer'' button looks like:


Opening a photo in PS
The first thing you want to do is to open a photo in Photoshop. Go to File > Open > find the photo you would like to edit.
Layers
When you have done that you can see in the box to the left there is a small photo of your picture and this is your first layer. We use layers to separate our workprojects from each other so that its possible to remove or add an edit without interfering with another. To make a second layer you press the first layer and drag it down to the ''Create a new layer'' that has a picture of a sheet of paper under the layers.You now have two layers! This is what the ''new layer'' button looks like:
Light and contrast
Now. To edit the lighting and contrast of the photo you can either go to Image > Adjustments > Brightness/contrast OR you can go to Image > Adjustments > Curves to adjust the brighness and darkness.
Black & White
If we want to make the photo black and white, sepia, negative and so on we go to Image > Adjustments > Gradient Map > Then choose the setting you want.
Pencil
A pencil is used if we want to draw on the photograph or maybe edit colour into only certain places. This is where the black and white setting comes in. Because now we can decide what in the picture we want to be in gray tones and what we want to be colourful. All we have to first is to drag the first layer into the ''Add layer mask'' that looks like a camera:
Once you've done that you can see there is a little white box next to your 1st layer photo. The drawings you do to your masterpiece now will show up as black marks on the white box. You can now draw on colour! If you make any mistakes - don't worry, just hit the x button on your keyboard and you can now erase any mistakes.
Spot Healing Brush Tool
This tool is great if you want to remove any blemishes and such. One does usually not remove birthmarks and/or scarring because its a part of ones body, but if wanted thats possible too, of course. Just press the button (picture below) and you are now free to click or drag over any imperfections and they will disappear.
Dodge Tool / Burn Tool
These are nice to use for teeth whitening and eye whitening. Also you can use it to darken your eyebrows if you forgot to put them on one day, no one will ever notice. Dodge Tool is for whitening or brightening certain areas up. Burn Tool does the opposite. It darkens the photo. The tool looks like this in the bar to the left (don't confuse this symbol with the symbol for zooming, they are quite similar :
Clone Stamp Tool
This tool is used to copy whatever you mark out and put it in another place by paining it on where ever you want it to be. This can be used to remove items you dont want in the picture or even make ones eye disappear.
Photo editing
We have been editing photos again! This time I am going to show you the before picture and the final result and a crazy version of them both.
 |
| This is the original photo of me that was taken in the photostudio. |
 |
| This is the edited photo. I have been very careful because it's not supposed to look like I have done anything with it. I removed any impurities on the face and te lines on my neck. The iris have been darkened while the white in the eye has been made brighter. I also tried to remove some fly away hairs, but this turned out to be quite hard as there are so many. The eyebrows have also been darkened to make them show up more. I used the Spot Healing Brush Tool to get rid of the chapped lips aswell. |
 |
| This is the crazy version. Eyes have been liquified larger to appear more like a doll, the lips aswell. The nose has been made smaller and I took a few pounds off my neck, as you can see. |
fredag 14. november 2014
Portrait
A portrait is a photograth of a person where the expression and face is in focus. It is supposed to show a bit of personality and sometimes the mood of the model. A portait is usully a photo of a person in a still position and often shows the person looking directly at the lense in order to engage the subject with the viewer.
 |
| This is Idunn, looking directly at the camera outside by the water. |
 |
| Ingvild is doing the same thing. |
 |
| Here Ingvild is in the photostudio. Not looking directly at the camera but still showing us alot of emotion and personality |
torsdag 13. november 2014
Backlight
Sometimes when you're out taking photos you may want to have an object that is infront of lighting. This causes backlight and makes the object dark, or even black. Luckily there is a way to fix this by setting your camera to a brighter setting to make the object appear brighter in the photo. One can also go the other way around and make the object darker. Usually its set to 0. which means there are no lighter or darker settings on. If you turn it up it becomes lighter and if you turn it down it becomes darker.
Here are some photos to demonstrate what the outcome will look like on different settings:


In these picture one can really see why this is a good feature to use in hard backlight. The first one is set to 0 brightness and darkness. The second one is set to bright:


Here are some photos to demonstrate what the outcome will look like on different settings:
This photo is taken using a very dark setting.

Here the lighting has been set to 0.

The brightness has been turned up quite a bit here.


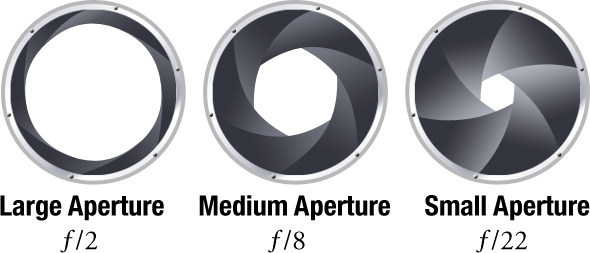
Aperture value
The aperture value works a lot like a pupil. It decides how much light to let into the lens along with ISO and Shutter speed. When it's light outside your pupil will naturally close so that the eye can adapt to the light surroundings. When its dark the pupil becomes bigger to absorb all the light it can find. This is also the case with aperture value.
One can also decide how much information we want to put into the picture by using different values. We can focus on all the things in the picture and make everything clear or we can focus on one object and make the rest blurry.


One can also decide how much information we want to put into the picture by using different values. We can focus on all the things in the picture and make everything clear or we can focus on one object and make the rest blurry.
For example if you were to take a photo of three cups and you wanted only one cup to stand out, while the rest are blurry, you set your camera to low aperture value.

If you want all the cups to be in focus you change your settings to high aperture value.

Inside of the camera there is an opening that looks like this:
A large opening makes a photo with one focus and the rest blurry, while a small opening makes everything in the picture turn out clear.
You will find these settings if you turn the wheel on your camera to ''Av'' or ''A''. Then you can turn the other wheel to choose how high or low you want your values to be.
torsdag 6. november 2014
Shutter speed
Shutter speed is the time the lense uses to open and close. If you have your camera set on long shutter speed it is going to recieve a lot more ''information'', or light, than it would otherwise. This is why one can walk around in the picture and get the movements as you go. With short shutter speed the photo is going to take in less information, and if set on the longest you might even get a black photo because it didn't, have enough time and light to get the info needed for a picture.
On your camera you can see that it says 1/1000. This means the photo is going to be taken in a thousandth of a second, which is fast shutter speed. But one can also go even further and turn it up a lot more than that. This is a good thing to use if you are going to take a picture that captures and freezes an object. For example if you were to take a picture of people jumping you would want to use short shutter speed.
One can also go the other way around where you make the cameralense stay open for a longer period of time insted of making it go off almost before you've hit the button. This is called long shutter speed. Now, instead of showing us how many thousands of a second, the camera shows us how many seconds we want to keep the shutter open. Seconds are often showed as: ''. The longer the shutter stays open the more it will capture.
Here you can see two photos that are taken with long shutter speed:


Here is two photos taken with short shutter speed:


All the photos have been taken by me using Canon, in teamwork with Ingvild and Anna.
On your camera you can see that it says 1/1000. This means the photo is going to be taken in a thousandth of a second, which is fast shutter speed. But one can also go even further and turn it up a lot more than that. This is a good thing to use if you are going to take a picture that captures and freezes an object. For example if you were to take a picture of people jumping you would want to use short shutter speed.
One can also go the other way around where you make the cameralense stay open for a longer period of time insted of making it go off almost before you've hit the button. This is called long shutter speed. Now, instead of showing us how many thousands of a second, the camera shows us how many seconds we want to keep the shutter open. Seconds are often showed as: ''. The longer the shutter stays open the more it will capture.
Here you can see two photos that are taken with long shutter speed:
The first picture, to the left, is the original. It did not come out as we wanted it to as its not a clear photo. Its edited in Paint, and Picasa to alter the colours and to make it black and white. I've also edited away a few things I thought was interfering with the main focus in the picture
This one has also been edited in Paint and Picasa. The light has been slightly darkened to show the expression of the girl, which is beautliful Anna :).
Here is two photos taken with short shutter speed:
This photo has been darkened, and allthough it may seem a bit too dark I just like the dark line thats going straight through the photo. It makes the swan really stand out.
Here one can really see the impontance of short shutter speed as if we were to capture this moment with long shutter speed it would all turn into a blurry white blob, if we were lucky. The water splashing around like this and the swan flapping with her wings (as seen in the previous picture) would need to be taken in the blink of an eye to capture all the details not even our eyes can pick up because it's moving so fast.
ISO
ISO determines the sensitivity of light on the camera.
Here is two photos taken using High ISO (6400)
 High ISO
If you set your ISO high the photo will turn out with quite sharp pixels, but this might not be a problem if you aren't going to enlarge the picture afterwards. As a small picture its going to look pretty good. We use a high ISO when the light isn't good. It makes the shutter speed short so that it freezes the picture instead of dragging it out, which it will do if the light is bad and you don't have your camera set on high ISO.

 Low ISO
Low ISO is used when the lighting is good and the shutter speed can be slower. A picture will turn out a lot more detailed and smooth if the camera is held still. If you are taking a photo in bad lighting on the other hand, the photo will turn out blurry.
Here are the same photos, but taken with the ISO turned down to 100:

All photos have been taken using Canon EOS 1100D.
Here is two photos taken using High ISO (6400)
High ISOIf you set your ISO high the photo will turn out with quite sharp pixels, but this might not be a problem if you aren't going to enlarge the picture afterwards. As a small picture its going to look pretty good. We use a high ISO when the light isn't good. It makes the shutter speed short so that it freezes the picture instead of dragging it out, which it will do if the light is bad and you don't have your camera set on high ISO.
Here are the same photos, but taken with the ISO
turned down to 100:
Low ISOLow ISO is used when the lighting is good and the shutter speed can be slower. A picture will turn out a lot more detailed and smooth if the camera is held still. If you are taking a photo in bad lighting on the other hand, the photo will turn out blurry.
Here are the same photos, but taken with the ISO turned down to 100:
All photos have been taken using Canon EOS 1100D.
Abonner på:
Kommentarer (Atom)